kubectl create cm cm11 --from-literal=key1=value1 -o yaml
create one yml file
apiVersion: v1
data:
key1: value1
key2: value2
key3: value3
key4: value4
kind: ConfigMap
metadata:
name: cm9999
~ kubectl apply -f cm6.yml


kubectl create cm cm11 --from-literal=key1=value1 -o yaml
create one yml file
apiVersion: v1
data:
key1: value1
key2: value2
key3: value3
key4: value4
kind: ConfigMap
metadata:
name: cm9999
~ kubectl apply -f cm6.yml
vi env.sh
variable1=value1
variable2=value2
variable3=value3
variable4=value4
kubectl create cm cm7 --from-env-file=env.sh
kubectl get cm
NAME DATA AGE
cm1 0 36m
cm2 0 36m
cm3 1 30m
cm4 2 23m
cm5 3 11m
cm6 1 2m4s
cm7 4 3s
kubectl create cm cm6 --from-file=env.sh
variables name cannot be started from numbers
e.g
355 variables=value1 >> wrong method
create 3 files
echo "file1" > test1.properties
echo "file2" > test2.properties
echo "file3" > test3.properties
kubectl create cm cm5 --from-file=properties/
$ kubectl describe cm cm5
Name: cm5
Namespace: default
Labels: <none>
Annotations: <none>
Data
====
test1.properties:
----
file1
test2.properties:
----
file2
test3.properties:
----
file3
Events: <none>
vi application.properties
**********************************
# database details
database_ip="192.168.0.4"
database_password="moon"
database_username="abid"
# admin details
username=moonadmin
pasword=moonpassword
************************************
kubectl create cm cm3 --from-file=application.properties
output:
NAME DATA AGE
cm1 0 6m12s
cm2 0 6m6s
cm3 1 12s
controlplane $ kubectl describe cm3
error: the server doesn't have a resource type "cm3"
controlplane $ kubectl describe cm cm3
Name: cm3
Namespace: default
Labels: <none>
Annotations: <none>
Data
====
application.properties:
----
# database details
database_ip="192.168.0.4"
database_password="moon"
database_username="abid"
# admin details
username=moonadmin
pasword=moonpassword
secound example :
vi moon.properties
# database details
database_ip="192.168.0.4"
database_password="moon"
database_username="abid"
added two config files
kubectl create cm cm4 --from-file=moonabid.properties --from-file=application.properties
ConfigMaps are APIs that store configuration data in key-value pairs. Their primary function is to keep the configuration separate from the container image. It can represent the entire configuration file or individual properties.
If you are working with Kubernetes, you want to keep your image light and portable. To do this, you should keep the configuration settings separate from the application code. Using ConfigMaps you can add different configuration data on pods to suit the environment they are running in.
For example, you may use the same code with different configuration while in the development, testing or production phase.
You can create ConfigMaps from files, directories, and literal values.
The basic syntax for creating a ConfigMap is:
kubectl create configmap [configmap_name] [attribute] [source]Depending on the source, the attribute will be:
--from file (if the source is a file/directory)--from-literal (if the source is a key-value pair)Use a .yaml file that contains the wanted configuration in the format of key-value pairs to create a ConfigMap:
kubectl create configmap [configmap_name] --from-file [path/to/yaml/file]For example, to create a ConfigMap under the name example-configmap from the example-configmap.yaml file, you would run:
kubectl create example-configmap --from-file /api/v1/namespace/default/configmaps/example-configmap.yamlKubernetes allows creating a ConfigMap from one or multiple files in any plaintext format (as long as the files contain key-value pairs).
To create a ConfigMap from a file, use the command:
kubectl create configmap [configmap_name] --from-file [path/to/file]To create a ConfigMap from multiple files, run:
kubectl create configmap [configmap_name] --from-file [path/to/file1] --from-file [path/to/file2] --from-file [path/to/file3]You can also create ConfigMaps from directories, that is from all the files within the directory. To do so, use the command:
kubectl create configmap [configmap_name] --from-file [path/to/directory]Kubectl packages each file from the directory into the new ConfigMap. Only files with basenames that are valid keys are included. Subdirectories and non-regular files are not included in the ConfigMap.
You can also create ConfigMaps from literal values, using the --from-literal option.
To do so, follow the basic syntax:
kubectl create configmap [configmap_name] --from-literal [key1]=[value1] --from-literal [key2]=[value]2To see details from a Kubernetes ConfigMap and the values for keys, use the command:
kubectl get configmaps [configmap_name] -o yamlThe output should display information in the yaml format:
apiVersion: v1
data:
  key1: value1
  key2: value2
  ...
kind: ConfigMap
metadata:
  creationTimeStamp: ...
  name: example-configmap
  namespace: default
  resourceVersion: ...
  selfLink: /api/v1/namespace/default/configmaps/example-configmap
uid: ...There are two ways you can configure a pod to use a specific ConfigMap:
Once you have downloaded or created a ConfigMap, you can mount the configuration to the pod by using volumes.
Add a volume section to the to the yaml file of your pod:
volumes:
  - name: config
  configMap
    name: [configmap_name]
    items:
    - key: [key/file_name]
    path: [inside_the_pod]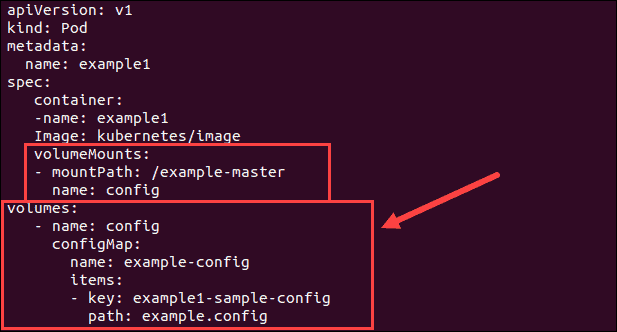
Once you have added the required content, use the kubectl create command to create the pod with the ConfigMap as the volume.
ConfigMaps allows you to introduce multiple values through environment variables.
Add the env section to the yaml file of the pod to pull the specified environment variable(s) from a ConfigMap:
env:
        - name: SPECIAL_LEVEL_KEY
          valueFrom:
            configMapKeyRef:
              name: [configmap_name]
              key: [key/file_name]
To pull all environment variables from a ConfigMap, add the envFrom section to the yaml file:
envFrom:
  - configMapKeyRef
      name: env-config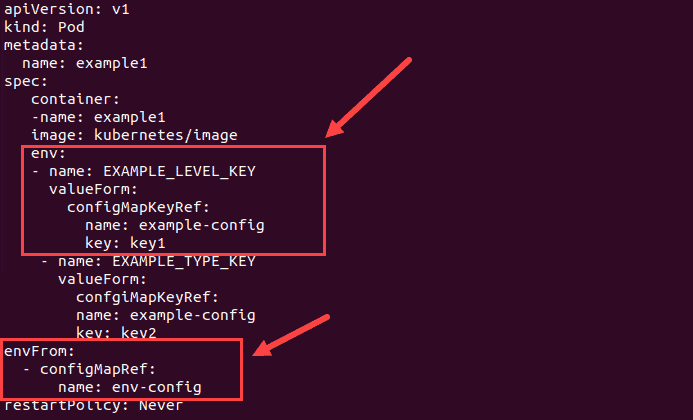
Then, use the kubectl create command to create the pod with the specified configuration settings.
Conclusion
This article showed you four different ways how to create ConfigMaps. Additionally, it includes two ways of using Kubernetes ConfigMaps with pods.
kubectl get cm
kubectl create cm cm1 --from-literal=database_ip="192.168.0.4"
key = value
Name: cm1
Namespace: default
Labels: <none>
Annotations: <none>
Data
====
database_ip:
----
192.168.0.4
Events: <none>
vi moon.yml
****************************
apiVersion: v1
kind: ResourceQuota
metadata:
name: pods-medium
spec:
hard:
requests.cpu: 0.5
requests.memory: 500Mi
limits.cpu: 1
limits.memory: 1Gi
*************************************
kubectl apply -f moon.yml -n tester
********************************************
create one more pod
vi abid.yml
apiVersion: v1
kind: Pod
metadata:
name: moon
spec:
containers:
- name: web-server
image: nginx
resources:
requests:
memory: 250Mi
cpu: 0.1
limits:
cpu: 0.5
memory: 500Mi
kubectl apply -f abid.yml -n tester
kubectl describe ns tester
A resource quota, defined by a ResourceQuota the object provides constraints that limit aggregate resource consumption per namespace. It can limit the number of objects that can be created in a namespace by type, as well as the total amount of computing resources that may be consumed by resources in that namespace.
create one namespace.
kubectl create namespace developer
apiVersion: v1
  kind: ResourceQuota
  metadata:
    name: pods-medium
  spec:
    hard:
      pods: "10"
kubectl apply -f quota.yml -n developer
kubectl describe ns developerName: developer
Labels: <none>
Annotations: <none>
Status: Active
Resource Quotas
Name: pods-medium
Resource Used Hard
-------- --- ---
pods 0 10
create namespace
kubectl create namespace test-team
vi moon.yml
*******************************************
apiVersion: v1
kind: Pod
metadata:
name: pod1
namespace: test-team
labels:
tier: frontend
spec:
containers:
- name: podngin
image: nginx
0r
kubectl delete pod pod1 -n test-team
how to change default NameSpace ?
kubectl config set-context --current --namespace=test-team