DMCA.com Protection Status Trending Topics About Devops

Thursday, 2 December 2021

How to deploy Kubernetes using Kubespray

How to deploy Kubernetes using Kubespray


Kubernetes is an open-source orchestration system that automates the process of deploying and maintaining containerized applications. It gives you the mechanism to schedule and run containers on clusters of several physical and/or virtual machines. For more information please read the official Kubernetes documentation.

Kubespray is a composition of Ansible playbooks, inventory, provisioning tools, and domain knowledge for generic OS/Kubernetes clusters configuration management tasks. It provides a highly available cluster, composable attributes and support for the most popular Linux distributions. It has become the de-facto production-ready Kubernetes installer that is trusted throughout the cloud-native community (10k stars on GitHub).

In this tutorial, we’ll show the steps required to deploy a Kubernetes cluster on UpCloud using Kubespray. The tutorial assumes that you have basic knowledge about Kubernetes and the different terminologies that comes with it but the steps are easy enough for beginners to follow along as well.

Setting up prerequisites

In principle, the steps in this guide can be divided into the following two main procedures which are required in order to set up a new Kubernetes cluster.

  1. Create the infrastructure
  2. Deploy Kubernetes

Before delving into the actual steps, clone Kubespray onto your own computer, for example by using the git command-line tool. If you do not already have git installed, you can use the command below to install git on Ubuntu or other Debian-based operating systems or check the git install guide for other OS options.

sudo apt install git-all

Then download the Kubespray package and change to the new directory.

git clone https://github.com/kubernetes-sigs/kubespray.git
cd kubespray

You’ll also need to install Ansible and other dependencies. Luckily, Kubespray provides a handy list of the requirements which can be used to install all prerequisites with a single command. However, for this to work, you’ll first need to have Python’s package installer, pip, available.

sudo apt install python3-pip
sudo pip3 install -r requirements.txt

If you face any issue while installing the prerequisites, please check the official Kubespray repository for troubleshooting steps.

Installing Terraform

Terraform is an infrastructure provisioning tool. It is used for building, changing, and versioning infrastructure safely and efficiently. Installing Terraform CLI on your computer provides you with all the tools you need to manage your infrastructure in the cloud.

To install Terraform, find the appropriate package for your system, download and install it.

For example, to install Terraform on most Linux systems, first, download the latest version.

wget https://releases.hashicorp.com/terraform/0.14.7/terraform_0.14.7_linux_amd64.zip

Then extract the binaries to a suitable location, such as /usr/local/bin and make sure it is included in your PATH environment variable. For example with the command below.

sudo unzip terraform_0.14.7_linux_amd64.zip -d /usr/local/bin

You can verify that the installation worked by listing Terraform’s available subcommands in a terminal.

terraform -help
Usage: terraform [-version] [-help]  [args]
The available commands for execution are listed below.
The primary workflow commands are given first, followed by
less common or more advanced commands.
...

Setting up API access

For Terraform to be able to deploy cloud resources on your UpCloud account, you first need to grant it access. To do so, follow the steps below.

Create a separate API account in your UpCloud Control Panel

It is recommended to create a separate API user for Terraform to interact with UpCloud API during infrastructure deployment instead of using your main account. You can do this at the UpCloud Control Panel using the workspace member accounts. Your API account name and password are very much comparable to a traditional API ID and key pair with the added benefit of being able to set them freely yourself.

To create a new account, select People on the left side of the UpCloud Control Panel and follow the instructions. For more information, see this tutorial on how to get started with the UpCloud API.

Allow API Access to your UpCloud Account

Once you’ve created your API account, you will need to allow it to access the UpCloud API so that Terraform can create your infrastructure on UpCloud. For this purpose, make sure you select the Allow API connections on the new account and set it to All addresses to easily ensure later steps in this guide will work.

Setting API connection permissions

You can and for security reasons perhaps should restrict this later to your own IP.

Set up UpCloud user credentials

Lastly, you’ll need to pass the new API account credentials to Terraform. Use the commands below to export your new API username and password as environment variables in your current shell session. The username and password will then be accessible to Terraform CLI when creating your cluster.

export TF_VAR_UPCLOUD_USERNAME=
export TF_VAR_UPCLOUD_PASSWORD=

Note: The credentials above are in plaintext. It is advisable to store the username and password Base64 encoded for more permanent use.

Overview of the infrastructure

A cluster in Kubernetes is composed of multiple control plane and worker nodes.  Control plane nodes are nodes that control and manage a set of worker nodes (workloads runtime) and worker nodes are nodes that run containerized applications.

An example of a Kubernetes cluster setup could look like the following.

Kubernetes cluster

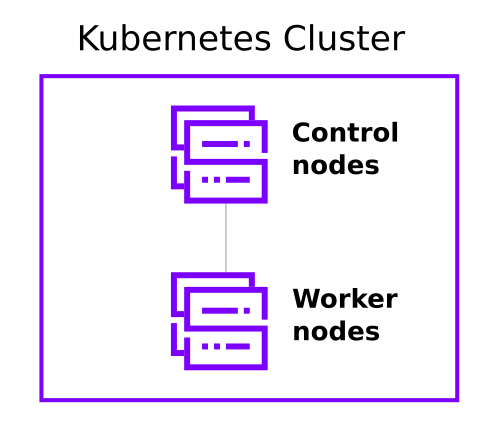
You need to decide the number of both control plane and worker nodes for your cluster. In this post, we will use one control plane node and three worker nodes.

To create the Kubernetes cluster, you need to make sure you have Terraform CLI installed on your system as well as the proper configuration for your cluster. Terraform helps us to define infrastructure as a code. Defining infrastructure as code brings many advantages such as simple editing, reviewing, and versioning, as well as easy sharing amongst team members.

Configuring the cluster

Next, we’ll set up the configuration for our cluster. To avoid modifying the template files, let us copy the required files into a new directory and do the changes there.

Create a directory called my-upcloud-cluster as follows. The CLUSTER variable here is a shorthand for our directory name. If you want to name your directory differently, just change the next line and the rest of the configuration works the same.

CLUSTER=my-upcloud-cluster
mkdir inventory/$CLUSTER

Copy the sample inventory and the default cluster configuration to the new directory.

cp -r inventory/sample inventory/$CLUSTER
cp -r contrib/terraform/upcloud/* inventory/$CLUSTER/

Change your working directory to the new configuration directory and edit the cluster-settings.tfvars file to match your requirements.

cd inventory/$CLUSTER
vim cluster-settings.tfvars

The following are the main Terraform variables that you can change in cluster-settings.tfvars  file.

  • hostname: A valid domain name, e.g. example.com. The maximum length is 128 characters.
  • template_name: The name or UUID of a base image.
  • username: A user to access the nodes e.g., via SSH. Note that the username kube is reserved by kubernetes.
  • ssh_public_keys: One or more public SSH keys is required to be able to access and provision the machines after deployment.
  • zone: The zone where the cluster will be created. Check the available zones for reference.
  • machines: The Cloud Servers that will be provisioned. Contain the list of machines composing the cluster. The key of this object will be used as the name of the machine.
    • node_type: The role of this node (master|worker, in Kubespray and hence in this guide called “master” due to legacy naming of the control plane — is likely to change in the future).
    • cpu: Number of CPU cores.
    • mem: Memory size in MB.
    • disk_size: The size of the storage in GB.

For example, to create a cluster with two control plane nodes, three worker nodes, and each node with 2 cores, 4GB memory, and 250GB disk size, replace the machines section in the variables with the following code snippet.

machines = {
  "master-0" : {
    "node_type" : "master",
    #number of cpu cores
    "cpu" : "2",
    #memory size in MB
    "mem" : "4096"
    # The size of the storage in GB
    "disk_size" : 250
  },
  "worker-0" : {
    "node_type" : "worker",
    #number of cpu cores
    "cpu" : "2",
    #memory size in MB
    "mem" : "4096"
    # The size of the storage in GB
    "disk_size" : 250
  },
  "worker-1" : {
    "node_type" : "worker",
    #number of cpu cores
    "cpu" : "2",
    #memory size in MB
    "mem" : "4096"
    # The size of the storage in GB
    "disk_size" : 250
  },
  "worker-2" : {
    "node_type" : "worker",
    #number of cpu cores
    "cpu" : "2",
    #memory size in MB
    "mem" : "4096"
    # The size of the storage in GB
    "disk_size" : 250
  }
}

Don’t forget to replace the value of the ssh_public_keys variable with your public SSH key as it will be used to ssh to each machine when installing Kubernetes using Kubespray.

Deploying the cluster

Now that the configurations are done, you can start deploying your cluster.

Initialise your configuration directory

The terraform init command is used to initialize a working directory containing Terraform configuration files. It will download and install the UpCloud Terraform provider plugin.

Run the following command to initialize Terraform.

terraform init

Verify your infrastructure

The terraform plan command verifies your configuration is syntactically correct and creates an execution plan. Terraform performs a refresh, unless explicitly disabled, and then determines what actions are necessary to achieve the desired state specified in the configuration files.

Run the following command to see your execution plan:

terraform plan --var-file cluster-settings.tfvars \
-state=tfstate-$CLUSTER.tfstate

Deploy the infrastructure

The terraform apply command is used to apply the changes required to reach the desired state of the configuration or the predetermined set of actions generated by a Terraform execution plan. It creates new or makes changes to the existing infrastructure as defined in your configuration.

Run the following command to create your cluster and answer yes when asked to confirm:

terraform apply --var-file cluster-settings.tfvars \
-state=tfstate-$CLUSTER.tfstate

Once Terraform has finished deploying, you can go and check your cluster resources at your UpCloud Control Panel. The following figure shows the four servers (one control plane and three worker nodes) created by Terraform.

Kubernetes cluster as seen in UpCloud Control Panel

You should also get an inventory file named inventory.ini that you can use with Kubespray. We will use the inventory file to set up the Kubernetes cluster later.

ls
cluster-settings.tfvars  inventory.ini  sample
terraform.tfstate tfstate-my-upcloud-cluster.tfstate

Setting up Kubernetes with Kubespray

Ansible is an open-source software provisioning, configuration management, and application-deployment tool enabling infrastructure as code.

Configure Ansible

Set  ANSIBLE_CONFIG environment variables to Kubespray’s ansible configuration file as follows:

export ANSIBLE_CONFIG=../../ansible.cfg

Check that you have basic SSH connectivity to the nodes. You can do this by running the following ansible command.

ansible -i inventory.ini -m ping all

You should see similar to the following figure if all nodes are reachable.

master-0.example.com | SUCCESS => {
    "ansible_facts": {
        "discovered_interpreter_python": "/usr/bin/python3"
    },
    "changed": false,
    "ping": "pong"
}
worker-0.example.com | SUCCESS => {
    "ansible_facts": {
        "discovered_interpreter_python": "/usr/bin/python3"
    },
    "changed": false,
    "ping": "pong"
}
worker-1.example.com | SUCCESS => {
    "ansible_facts": {
        "discovered_interpreter_python": "/usr/bin/python3"
    },
    "changed": false,
    "ping": "pong"
}
worker-2.example.com | SUCCESS => {
    "ansible_facts": {
        "discovered_interpreter_python": "/usr/bin/python3"
    },
    "changed": false,
    "ping": "pong"
}

Deploy Kubernetes

You can now deploy Kubernetes with Kubespray using the inventory file generated during the Terraform apply step as follows.

Note: if you use a different user to access the nodes other than the default ubuntu, please replace ubuntu with the new user in the inventory.ini file.

ansible-playbook -i inventory.ini ../../cluster.yml -b -v

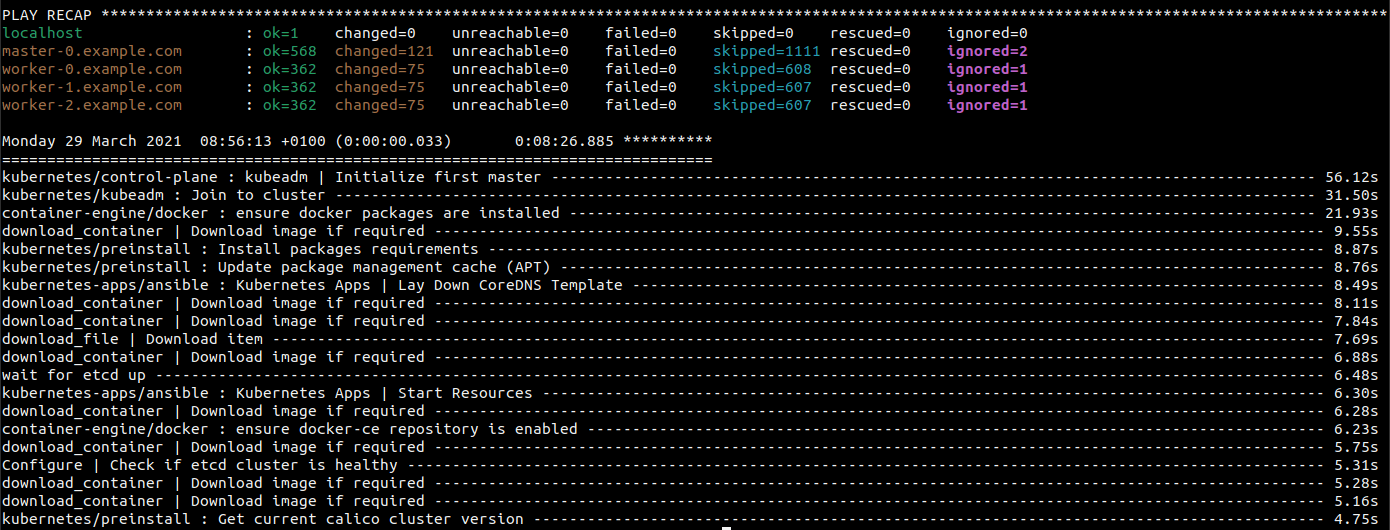
Then sit back and relax while Ansible and Kubespray do all the heavy lifting!

Once done, you will see a play recap of the deployment like in the screenshot below.

Ansible deployment completed

Accessing your new Kubernetes cluster

By default, Kubespray configures kube-master hosts with access to kube-apiserver via port 6443 as http://127.0.0.1:6443. You can connect to this from one of the master nodes.

Get the IP address of one of the master nodes and SSH to it.

For example, the following script retrieves the IP of master-0 node from the inventory file and opens an SSH connection to it using the default username.

# get the  IP address of  master-0
ip=$(grep -m 1  "master-0" inventory.ini | grep -o '[0-9]\{1,3\}\.[0-9]\{1,3\}\.[0-9]\{1,3\}\.[0-9]\{1,3\}' | head -n 1)
# ssh to master-0 node
ssh ubuntu@$ip

Once you are logged into one of the master nodes, you can run any of the kubectl commands. For example, use the command below shows the list of nodes in the cluster.

sudo kubectl get nodes
NAME                   STATUS   ROLES                  AGE    VERSION
master-0.example.com   Ready    control-plane,master   10m   v1.20.5
worker-0.example.com   Ready                           10m   v1.20.5
worker-1.example.com   Ready                           10m   v1.20.5
worker-2.example.com   Ready                           10m   v1.20.5

Accessing Kubernetes Cluster from a workstation

While in the example above, we logged into one of the nodes in the cluster, it’s also possible to command Kubernetes right from your own workstation. To make this work, simply copy the /etc/kubernetes/admin.conf from a master node to your workstation and use it with kubectl.

The following script does the trick.

# get the  IP address of  master-0
ip=$(grep -m 1  "master-0" inventory.ini | grep -o '[0-9]\{1,3\}\.[0-9]\{1,3\}\.[0-9]\{1,3\}\.[0-9]\{1,3\}' | head -n 1)
# copy /etc/kubernetes/admin.conf file on the local system
ssh ubuntu@$ip 'sudo cat /etc/kubernetes/admin.conf' > admin.conf

Make sure you have installed the kubectl tool on your local machine.

If you haven’t done so already please follow the instructions here.  Once you have installed the tool you can interact with your cluster.

To access your Kubernetes cluster remotely, you need to tell kubectl where your configuration file is. One way to do that is to point the KUBECONFIG environment variable to your cluster kubeconfig file as shown below:

export KUBECONFIG=admin.conf

One last thing you need to do before you run any of the kubectl commands is to replace the Kubernetes API IP address in the admin.conf with one of the control plane node IP addresses.

Open admin.conf file with your favourite text editor and replace 127.0.0.1 with the IP address you get from above.

vim admin.conf

Alternatively, if you already have the IP address of the first master node save in the $ip variable. You can swap the 127.0.0.1 IP with the IP saved in the variable using the following command.

sed -i "s/127.0.0.1/$ip/g" admin.conf

With the master node IP set in the admin file, you are ready to start playing with your cluster from your local machine!

For example, use the following command to show a list of namespaces in your cluster.

kubectl get namespace
NAME             STATUS  AGE
default          Active  12m
kube-node-lease  Active  12m
kube-public      Active  12m
kube-system      Active  12m

Congratulations, you now have a fully functional production-ready Kubernetes cluster up and running!

Teardown

Once you are done testing the cluster and no longer need it, you can use Terraform to tear down the deployed infrastructure.

The terraform destroy command is used to destroy the Terraform-managed infrastructure. It terminates resources defined in your Terraform configuration and performs the reverse of what the terraform apply does.

You can tear down your infrastructure using the following Terraform command:

terraform destroy --var-file cluster-settings.tfvars \
-state=tfstate-$CLUSTER.tfstate ../../contrib/terraform/upcloud/

After deletion, you can always use the same configuration files to teak and modify your cluster and deploy it again with a moments notice!

Monday, 1 November 2021

Docker Cheat Code

Docker Cheat Code


mini project Terraform Resources without variables


  provider "aws" {

  region     = "us-east-1"

  access_key = "AKIARUPJBF7JN6BKVGQ"

  secret_key = "KfU0tFpao0b+BODvc+GG6xN99jTMdfVkt1aurid"

}


resource "aws_vpc" "cloud-vpc" {

  cidr_block       = "10.0.0.0/16"

  instance_tenancy = "default"


  tags = {

    Name = "cloud-vpc"

  }

}


#


resource "aws_subnet" "public-subnet" {

  vpc_id     = aws_vpc.cloud-vpc.id

  cidr_block = "10.0.1.0/24"


  tags = {

    Name = "public-subnet"

  }

}


resource "aws_subnet" "private-subnet" {

  vpc_id     = aws_vpc.cloud-vpc.id

  cidr_block = "10.0.2.0/24"


  tags = {

    Name = "private-subnet"

  }

}


resource "aws_security_group" "moon_security" {

  name        = "moon_security"

  description = "Allow TLS inbound traffic"

  vpc_id      = aws_vpc.cloud-vpc.id

  ingress {

      description      = "TLS from VPC"

      from_port        = 22

      to_port          = 22

      protocol         = "tcp"

      cidr_blocks      = ["0.0.0.0/0"]

    }


  egress {

      from_port        = 0

      to_port          = 0

      protocol         = "-1"

      cidr_blocks      = ["0.0.0.0/0"]

    }


  tags = {

    Name = "moon_security"

  }

}


resource "aws_internet_gateway" "cloud-igw" {

  vpc_id = aws_vpc.cloud-vpc.id


  tags = {

    Name = "cloud-igw"

  }

}


resource "aws_route_table" "public-rt" {

  vpc_id = aws_vpc.cloud-vpc.id


  route {

      cidr_block = "0.0.0.0/0"

      gateway_id = aws_internet_gateway.cloud-igw.id

    }


  tags = {

    Name = "public-rt"

  }

}


resource "aws_route_table_association" "route-ass" {

  subnet_id      = aws_subnet.public-subnet.id

  route_table_id = aws_route_table.public-rt.id

}


resource "aws_key_pair" "cloud-key" {

  key_name   = "cloud"

  public_key = "ssh-rsa AAAAB3NzaC1yc2EAAAADAQABAAABAQCu8tss1HsG448fxpXK/m+MXaZLfeyxDrh5q/9kuJqA1d2QEehw99Jdfq3ZNs1NTVrlPH8DBdtk1U2+oG1tejWzviWGZ8ksmXZmv6RIoJYy/UBtz72fA8w9YMYpXBIYRMUtymtzGEAf95GZ2IOfTq2gPo6cGYXzd0isj4Ld9QJrtqS0aTp8XU2mMrhzKdQKBMDoCvpzUX1rH1K+00HKDn2S6iiuWv+8zJLnr1+H0mUFmJCT+udkKchpHIo/OUJwB5XviNsAdHq2kme/dEvrqRhhCgnHWq1afqbfTYnKuwwGmPQXlh97NQCgxOCB4wUTCennb6DlZ6ZZkZPXVI+qxfgZ root@ip-172-31-46-6.ap-south-1.compute.internal"

}


resource "aws_instance" "cloud-instance" {

  ami           = "ami-02e136e904f3da870"

  instance_type = "t2.micro"

  subnet_id     = aws_subnet.public-subnet.id

  vpc_security_group_ids = [aws_security_group.moon_security.id]

  key_name      = "cloud"

  tags = {

    Name = "HelloWorld"

  }

}


resource "aws_instance" "db-instance" {

  ami           = "ami-02e136e904f3da870"

  instance_type = "t2.micro"

  subnet_id     = aws_subnet.private-subnet.id

  vpc_security_group_ids = [aws_security_group.moon_security.id]

  key_name      = "cloud"

  tags = {

    Name = "database"

  }

}


resource "aws_eip" "public-ip" {

  instance = aws_instance.cloud-instance.id

  vpc      = true

}


resource "aws_eip" "cloud-natip" {

  vpc      = true

}


resource "aws_nat_gateway" "cloud-nat" {

  allocation_id = aws_eip.cloud-natip.id

  subnet_id     = aws_subnet.public-subnet.id


}


resource "aws_route_table" "private-rt" {

  vpc_id = aws_vpc.cloud-vpc.id


  route {

      cidr_block = "0.0.0.0/0"

      gateway_id = "aws_nat_gateway.cloud-nat"

    }


  tags = {

    Name = "cloud-nat"

  }

}


resource "aws_route_table_association" "nat-ass" {

  subnet_id      = aws_subnet.private-subnet.id

  route_table_id = aws_route_table.private-rt.id

}


Saturday, 23 October 2021

How To Create Ec2- instance with key-pair, security-group and Elastic Ip via Terraform

 provider "aws" {
  region     = "us-east-1"
  access_key = "AKIARUPJBF7JG"
  secret_key = "Qq55MbE3yIYVTOYullQYv9jgdVQbAQ"
}

resource "aws_instance" "kashmir" {
  ami           = "ami-02e136e904f3da870" # my ami
  instance_type = "t2.micro"
  key_name      = "moon"
  vpc_security_group_ids = [aws_security_group.moon_security.id]
tags = {
 Name = "moonabid"
}
}
resource "aws_key_pair" "moon" {
  key_name   = "moon"
  public_key = "ssh-rsa AAAAB3NzaC1yc2EAAAADAQABAAABAQCmh2uYKuso2BAIbkYWaKcdSM7ufgHqTorggTt/iHGFhIYipAFyDkklPYDtKoHsnplcC/RjIAyCMDVnVQz/6Nv6GQrvzHjs0QSv2Gmhz+RKWMinihVRW0DS+kTKDltW5bftnPUJYLSkGwzbdoqH9PnV3yAk3I4RJZWWHEttUL9Xb0tN6JkMizAO7yJ/r3p1TwoYRq/HraESuv4vA1QgMdziFWMtO4ZzAr43DjejiqXlvBGqD8/mRwKESHmNypVkId9qlQG1mluE9PHfdsrVSnbJ3We2IKN33HsLjHzWP664F6hJdzDy0V6vGgM6GSGzOrU7vy9X1UsG0FpA8Lp3lq3V root@ip-172-31-0-195.ap-south-1.compute.internal"
}
resource "aws_eip" "mooneip" {
  instance = aws_instance.kashmir.id
  vpc      = true
}

resource "aws_default_vpc" "default" {
  tags = {
    Name = "Default VPC"
  }
}
resource "aws_default_vpc" "default" {
  tags = {
    Name = "Default VPC"
  }
}
resource "aws_security_group" "moon_security" {
  name        = "moon_security"
  description = "Allow TLS inbound traffic"
  vpc_id      = aws_default_vpc.default.id
  ingress {
      description      = "TLS from VPC"
      from_port        = 443
      to_port          = 443
      protocol         = "tcp"
      cidr_blocks      = ["0.0.0.0/0"]
    }

  egress {
      from_port        = 0
      to_port          = 0
      protocol         = "tcp"
      cidr_blocks      = ["0.0.0.0/0"]
    }

  tags = {
    Name = "moon_security"
  }
}


Monday, 13 September 2021

Kubernetes Interview Questions and Answers

 1. What is Kubernetes?

This is one of the most basic Kubernetes interview questions yet one of the most important ones! Kubernetes is an open-source container orchestration tool or system that is used to automate tasks such as the management, monitoring, scaling, and deployment of containerized applications. It is used to easily manage several containers (since it can handle grouping of containers), which provides for logical units that can be discovered and managed.

2. What are K8s? 

K8s is another term for Kubernetes. 

3. What is orchestration when it comes to software and DevOps? 

Orchestration refers to the integration of multiple services that allows them to automate processes or synchronize information in a timely fashion. Say, for example, you have six or seven microservices for an application to run. If you place them in separate containers, this would inevitably create obstacles for communication. Orchestration would help in such a situation by enabling all services in individual containers to work seamlessly to accomplish a single goal. 

4. How are Kubernetes and Docker related?

This is one of the most frequently asked Kubernetes interview questions, where the interviewer might as well ask you to share your experience working with any of them. Docker is an open-source platform used to handle software development. Its main benefit is that it packages the settings and dependencies that the software/application needs to run into a container, which allows for portability and several other advantages. Kubernetes allows for the manual linking and orchestration of several containers, running on multiple hosts that have been created using Docker. 

5. What are the main differences between the Docker Swarm and Kubernetes?

Docker Swarm is Docker’s native, open-source container orchestration platform that is used to cluster and schedule Docker containers. Swarm differs from Kubernetes in the following ways:

  • Docker Swarm is more convenient to set up but doesn’t have a robust cluster, while Kubernetes is more complicated to set up but the benefit of having the assurance of a robust cluster
  • Docker Swarm can’t do auto-scaling (as can Kubernetes); however, Docker scaling is five times faster than Kubernetes 
  • Docker Swarm doesn’t have a GUI; Kubernetes has a GUI in the form of a dashboard 
  • Docker Swarm does automatic load balancing of traffic between containers in a cluster, while Kubernetes requires manual intervention for load balancing such traffic  
  • Docker requires third-party tools like ELK stack for logging and monitoring, while Kubernetes has integrated tools for the same 
  • Docker Swarm can share storage volumes with any container easily, while Kubernetes can only share storage volumes with containers in the same pod
  • Docker can deploy rolling updates but can’t deploy automatic rollbacks; Kubernetes can deploy rolling updates as well as automatic rollbacks

6. What are the main components of Kubernetes architecture?

There are two primary components: the master node and the worker node. Each of these components has individual components in them.

7. What is a node in Kubernetes?

A node is the smallest fundamental unit of computing hardware. It represents a single machine in a cluster, which could be a physical machine in a data center or a virtual machine from a cloud provider. Each machine can substitute any other machine in a Kubernetes cluster. The master in Kubernetes controls the nodes that have containers. 

8. What does the node status contain?

The main components of a node status are Address, Condition, Capacity, and Info.

9. What process runs on Kubernetes Master Node? 

The Kube-api server process runs on the master node and serves to scale the deployment of more instances.

10. What is a pod in Kubernetes?

In this Kubernetes interview question, try giving a thorough answer instead of a one-liner. Pods are high-level structures that wrap one or more containers. This is because containers are not run directly in Kubernetes. Containers in the same pod share a local network and the same resources, allowing them to easily communicate with other containers in the same pod as if they were on the same machine while at the same time maintaining a degree of isolation.

11. What is the job of the kube-scheduler?

The kube-scheduler assigns nodes to newly created pods.

12. What is a cluster of containers in Kubernetes? 

A cluster of containers is a set of machine elements that are nodes. Clusters initiate specific routes so that the containers running on the nodes can communicate with each other. In Kubernetes, the container engine (not the server of the Kubernetes API) provides hosting for the API server.

13. What is the Google Container Engine?

The Google Container Engine is an open-source management platform tailor-made for Docker containers and clusters to provide support for the clusters that run in Google public cloud services. 

14. What are Daemon sets?

A Daemon set is a set of pods that runs only once on a host. They are used for host layer attributes like a network or for monitoring a network, which you may not need to run on a host more than once.

15. What is ‘Heapster’ in Kubernetes?

In this Kubernetes interview question, the interviewer would expect a thorough explanation. You can explain what it is and also it has been useful to you (if you have used it in your work so far!). A Heapster is a performance monitoring and metrics collection system for data collected by the Kublet. This aggregator is natively supported and runs like any other pod within a Kubernetes cluster, which allows it to discover and query usage data from all nodes within the cluster.

16. What is a Namespace in Kubernetes?

Namespaces are used for dividing cluster resources between multiple users. They are meant for environments where there are many users spread across projects or teams and provide a scope of resources.

17. Name the initial namespaces from which Kubernetes starts?

  • Default
  • Kube – system
  • Kube – public

18. What is the Kubernetes controller manager?

The controller manager is a daemon that is used for embedding core control loops, garbage collection, and Namespace creation. It enables the running of multiple processes on the master node even though they are compiled to run as a single process.

19. What are the types of controller managers?

The primary controller managers that can run on the master node are the endpoints controller, service accounts controller, namespace controller, node controller, token controller, and replication controller.

20. What is etcd?

Kubernetes uses etcd as a distributed key-value store for all of its data, including metadata and configuration data, and allows nodes in Kubernetes clusters to read and write data. Although etcd was purposely built for CoreOS, it also works on a variety of operating systems (e.g., Linux, BSB, and OS X) because it is open-source. Etcd represents the state of a cluster at a specific moment in time and is a canonical hub for state management and cluster coordination of a Kubernetes cluster.

21. What are the different services within Kubernetes?

Different types of Kubernetes services include: 

  • Cluster IP service
  • Node Port service
  • External Name Creation service and 
  • Load Balancer service

22. What is ClusterIP?

The ClusterIP is the default Kubernetes service that provides a service inside a cluster (with no external access) that other apps inside your cluster can access. 

23. What is NodePort? 

The NodePort service is the most fundamental way to get external traffic directly to your service. It opens a specific port on all Nodes and forwards any traffic sent to this port to the service.

24. What is the LoadBalancer in Kubernetes? 

The LoadBalancer service is used to expose services to the internet. A Network load balancer, for example, creates a single IP address that forwards all traffic to your service.  

25. What is a headless service?

A headless service is used to interface with service discovery mechanisms without being tied to a ClusterIP, therefore allowing you to directly reach pods without having to access them through a proxy. It is useful when neither load balancing nor a single Service IP is required. 

D26 What is Kubelet?

The kubelet is a service agent that controls and maintains a set of pods by watching for pod specs through the Kubernetes API server. It preserves the pod lifecycle by ensuring that a given set of containers are all running as they should. The kubelet runs on each node and enables the communication between the master and slave nodes.

27. What is Kubectl?

Kubectl is a CLI (command-line interface) that is used to run commands against Kubernetes clusters. As such, it controls the Kubernetes cluster manager through different create and manage commands on the Kubernetes component

28. Give examples of recommended security measures for Kubernetes.

Examples of standard Kubernetes security measures include defining resource quotas, support for auditing, restriction of etcd access, regular security updates to the environment, network segmentation, definition of strict resource policies, continuous scanning for security vulnerabilities, and using images from authorized repositories.

29. What is Kube-proxy? 

Kube-proxy is an implementation of a load balancer and network proxy used to support service abstraction with other networking operations. Kube-proxy is responsible for directing traffic to the right container based on IP and the port number of incoming requests.

30. How can you get a static IP for a Kubernetes load balancer? 

A static IP for the Kubernetes load balancer can be achieved by changing DNS records since the Kubernetes Master can assign a new static IP address.

Jumpstart Your Career with Kubernetes Training

Having a good understanding of DevOps and on-premises software development can be quite useful in helping you gain a holistic view of the subject matter. Ultimately, taking the Kubernetes Certification Training Course and taking your time to study and understand what you’ve learned while preferably putting it into practice is the best way to prepare for an Kubernetes interview, and  the Kubernetes interview questions that you’ve learned here are the icing on the cake. The more familiar you are with these types of Kubernetes interview questions, the better able you will be to show off your skills and Kuberenetes knowledge.

Saturday, 11 September 2021

DOCKER GUIDE: HOW TO INSTALL DOCKER AND WRITE DOCKERFILES

 In this blog we will discuss how to install it in our system and write docker files .

Here I will use ubuntu 20.04 to install docker.

Before installing docker make sure following system requirements are met

  1. Linux kernel version >= 3.8
  2. 64-bit Processor
  3. Memory :- 2GB recommended (512 MB minimum)

To check the version of Linux kernel, use command :-

uname -r

To install docker in your systems, Follow below steps:-

  1. update your OS using command :- sudo apt-get update to get latest packages(here “sudo” ensures that command runs with root access)

2. To download latest docker packages from docker site, some necessary certificates are required that has to be downloaded using command:-

sudo apt-get install apt-transport-https ca-certificates

3. Next step is to add the Linux official GPG key. GPG key is used by Linux to keep your files and packages safe and encrypted. To add GPG key use below command:-

curl -fsSL https://download.docker.com/linux/ubuntu/gpg | sudo apt-key add -

4. After adding GPG key verify it using command:-

sudo apt-key fingerprint 0EBFCD88

5. Next, set up a stable docker repository . to do this use following command:-

sudo add-apt-repository “deb [arch=amd64] https://download.docker.com/linux/ubuntu $(lsb_release -cs) stable”

6. Update ubuntu packages using sudo apt-get update to ensure all packages are up to date

7. Finally install docker engine from docker website using command:-

sudo apt-get install docker-ce

9. Congratulations now you have docker installed on your ubuntu machine. To check the docker version use command:-

sudo docker version

DockerFiles:-

In my previous post DOCKER GUIDE: WHAT IS DOCKER AND WHY USE IT:- i wrote about images and their use in docker . Dockerfile is simply a text file that contains instructions to build an image. All docker images have their own dockerfiles.

Some important commands to write dockerfiles:-

  1. FROM :- FROM command is used to set the base image where next instructions of dockerfile will run.
  2. COPY :- copy command is used to copy contents of one directory on host machine to another directory inside the container.
  3. RUN :- run command is used to run any command on the current image.
  4. WORKDIR :- workdir command is used to set the working directory where subsequent instructions of dockerfile will run.
  5. CMD :- CMD command is used to execute a command after creation of the container. Each dockerfile runs only one CMD instruction. If there are more than one CMD instruction in a dockerfile then the last CMD instruction will run and all others will be skipped.

Now suppose you have a small nodeJS application . Let us build an image of this application by writing a dockerfile.

  • FROM node:10-alpine:- Set node:10-alpine image as the base image for rest of the instructions of dockerfile.
  • RUN mkdir -p /home/app:- create a directory /home/app
  • COPY ./project /home/app:- copy all content of the project folder to /home/app directory of the container.
  • WORKDIR /home/app:- set /home/app as working directory, all the subsequent instructions on dockerfile will run here.
  • RUN npm install:- install all the dependencies of your project mentioned in package.json and package-lock.json files.
  • CMD [“node”, “index.js”]:- execute the application.

BUILD THE IMAGE :- After writing the dockerfile next step is to build the image. Use below command to build image from our dockerfile :-

Sudo docker build -t <Image-name>:<tag-name> .

Note:- “sudo” is used here to run the command with root access.

IMAGE TAGGING :- In the above command -t flag is used for tagging your image. Tagging is a process of adding metadata to your docker images like version no. If you do not specify any tag name for the image, docker assigns it by itself as “latest”. Tagging is a optional process

The above command runs each instruction specified in your dockerfile and build your image in layers.

RUN THE IMAGE:- To run your image use command:-

Sudo Docker run <image>

GET YOUR IMAGE INFO:- To verify your image, run command:-

Sudo Docker images

Above command will give you a list of all the images in your system with their details .

Congratulations, you have successfully installed docker in your system and created your application’s image via dockerfile.